
Install the GTM container snippets, add a GA4 configuration tag with your Measurement ID, publish, and verify in Preview mode. That’s the entire job. Once the container is live, most linked platforms show new data within about 30 minutes, and Preview should show your tags firing green before you ever hit publish for real.
TL;DR:
- Most linked platforms like WordPress, Shopify, Wix, and Squarespace offer easy integrations or plugins to install GTM without manual code editing, simplifying setup.
- Verifying GTM is working correctly requires preview mode and checking DebugView, with data typically appearing in GA4 within about 30 minutes after publishing.
- Using consistent naming conventions and folder organization helps maintain a manageable container as tags, variables, and triggers grow over time.
- Setting up specific event triggers like clicks, form submissions, and page views in GTM allows accurate measurement of essential user interactions for small business websites.
- Employing a proper privacy setup with GTM’s Consent Mode and limiting account access reduces risks related to data privacy regulations and accidental changes.
Table of Contents
- How Do You Create a Google Tag Manager Account and Container?
- How Do You Install the GTM Code Snippets on Your Site?
- Can You Install GTM Through WordPress, Shopify, Wix, or Squarespace?
- How Do You Add a Google Tag or GA4 Configuration Tag?
- How Do You Preview and Verify That GTM Is Working?
- How Do You Publish the Container and Manage Versions?
- What Should You Check When Something Goes Wrong?
- What Naming Conventions Keep a GTM Container Manageable?
- How Do You Track Clicks, Form Submissions, and Page Views?
- How Do Built-In and Custom Variables Actually Help You?
- What Is a Data Layer and Why Does GTM Need One?
- How Do You Set Up Event Tracking in Google Tag Manager?
- What Privacy and Consent Settings Should GTM Users Configure?
- Should You Set Up GTM Yourself or Hire Help?
- Want a Done-for-You GTM Setup Instead?
- Where Can You Find Official GTM Documentation?
- Sources
- FAQ
How Do You Create a Google Tag Manager Account and Container?
Start at tagmanager.google.com and sign in with the Google account you want to manage the site long term, not a personal account you might lose access to later. Google Tag Manager is free, and it lets you deploy and manage tracking tags without editing site code every time you need a change.
The setup wizard asks for two names, and they serve different purposes:
- Account name: usually your business name (this can hold multiple containers if you manage several sites).
- Container name: use your actual domain, like
yourbusiness.com, so you can tell containers apart later if you add more. - Platform: choose “Web” for a standard website (Google Tag Manager for beginners also offers iOS, Android, and server options, but Web is what you need here).
After you accept the terms, GTM generates a container ID that looks like GTM-XXXXXXX. Write it down. You’ll need it for the CMS plugin field or the developer who installs your code.
How Do You Install the GTM Code Snippets on Your Site?
When your container finishes setup, a dialog pops up with two code blocks. Copy both. You cannot use one without the other and expect full accuracy.
- Paste the script snippet as high as possible in the
<head>of every page. If you already run adataLayervariable for other tools, the GTM script should sit below it. - Paste the noscript snippet immediately after the opening
<body>tag. This backup version fires for visitors with JavaScript disabled, which still happens more often than most site owners assume. - Confirm both blocks appear on every template, not just the homepage. Miss a template and you’ll get blind spots in your reports later.
Placement isn’t a formality. A script buried near the bottom of <head> or dropped after other scripts can load late, missing early clicks or fast bounces. The official installation instructions are specific about this for a reason.
Pro Tip: If a developer is handling this, send them exactly this: “Please paste the GTM script snippet directly after the opening <head> tag on every page template, and the noscript snippet directly after the opening <body> tag. Confirm placement on the homepage, at least one category or service page, and the checkout or contact page before calling it done.”
Can You Install GTM Through WordPress, Shopify, Wix, or Squarespace?
Most small-business platforms let you skip manual code editing entirely, and you should take that route whenever it’s available.
- WordPress: plugins such as Google Site Kit or DuracellTomi’s Google Tag Manager for WordPress install the container for you. Check the plugin’s own documentation for compatibility with your theme before activating it.
- Shopify: paste the script into
theme.liquidin the header section, and the noscript snippet right after the opening body tag, or use an app built for this purpose. - Wix: use the built-in Marketing Integrations panel and paste your container ID directly, no code editing required.
- Squarespace: add the snippets through the Code Injection settings under Header and Footer.
Whichever platform you use, once a plugin or integration asks for your container ID, just paste the GTM-XXXXXXX string. Manual snippet placement is still the right call if your platform has no official integration or if you’re running a custom-built site.
How Do You Add a Google Tag or GA4 Configuration Tag?
This is the tag that actually starts collecting analytics data, and most small sites only need one to start.
- In GTM, click Tags → New, then choose the Google tag or GA4 Configuration tag type.
- Paste your GA4 Measurement ID, formatted as
G-XXXXXXXXXX. You’ll find this in your GA4 property settings if you haven’t copied it already. - Set the trigger to Initialization or All Pages so the configuration loads on every page load, not just specific sections.
- Name the tag something readable, like “GA4 Configuration – All Pages,” so anyone else who opens this container later understands its purpose instantly.
Store the Measurement ID as a constant variable instead of pasting it directly into the tag. One tutorial points out that this saves real time later: change the variable once and every tag referencing it updates automatically, rather than hunting through a dozen tags to fix a typo. If you’re still fuzzy on what a Measurement ID actually does, a simple guide to Google Analytics for small businesses walks through the basics before you touch GTM at all.
How Do You Preview and Verify That GTM Is Working?
Never publish blind. GTM’s Preview mode exists specifically so you catch mistakes before real visitors do.
- Click Preview in the top right of your container, then enter your site’s URL when prompted.
- A new tab opens with the Tag Assistant connected, showing which tags fired on each page you visit and which didn’t.
- If Preview won’t connect, disable ad blockers or browser extensions first, then try an incognito window. A mistyped URL or a stray trailing slash causes more failed connections than actual tag errors.
- Cross-check in GA4’s DebugView to confirm events are landing on the analytics side, not just inside GTM.
A quick reality check on timing: even after everything fires correctly in Preview and DebugView, standard GA4 reports can take up to about 30 minutes to reflect new data. Don’t panic and start re-editing tags because your dashboard looks empty five minutes after launch.
How Do You Publish the Container and Manage Versions?
Publishing is simple, but skipping the habits around it is how small sites end up with broken tracking nobody notices for weeks.
- Click Submit, then Publish to push your changes live.
- Name every version descriptively, like “Added GA4 config + contact form trigger,” instead of leaving GTM’s auto-generated timestamp as the only record.
- Save a draft instead of publishing immediately if you want a second set of eyes on a bigger change, like adding conversion tracking across checkout pages.
- If something breaks after publishing, open Versions and roll back to the last working version in a couple of clicks. You don’t need to rebuild anything from scratch.
What Should You Check When Something Goes Wrong?
Most GTM problems fall into a handful of repeat offenders, and none of them require starting over.
- Preview won’t connect: disable extensions, clear cache, or test in an incognito window.
- Tag not firing: double-check the trigger conditions and confirm the Measurement ID doesn’t have a typo or stray space.
- Double tracking during a migration: run old and new tracking side by side using a suppression trigger, which MeasureU’s migration guidance recommends specifically to avoid counting the same event twice while you phase out legacy scripts.
- Missing events in GA4: confirm debug mode is active for testing, and remember standard reports can lag up to 30 minutes behind real activity.
Pro Tip: Keep your old analytics script live for a few days after switching to GTM, but suppress the new tags from firing until you’ve confirmed the old code is fully removed. Running both permanently is worse than running neither.
What Naming Conventions Keep a GTM Container Manageable?
A container with 40 tags named “Tag 1,” “Tag 2,” and “New Tag Copy” is unusable within a year, and that’s not an exaggeration for a growing small business.
Use a consistent prefix system: GA4, Ads, or Meta for the tag type, followed by what it tracks. “GA4 – Contact Form Submit” tells you everything in five words. Triggers deserve the same treatment: name them for the condition they check, like “Click – Phone Number Link” or “Form Submit – Quote Request,” rather than leaving GTM’s generic auto-labels in place.
Variables get sloppy fastest because they multiply quietly. A container that starts with three custom variables can have twenty within a year once you’re tracking scroll depth, video engagement, and outbound clicks. Prefix custom variables by type too, something like CV - GA4 Measurement ID or DLV - Product Price, so anyone opening the container (including a future version of you) can scan the list and know instantly what each one does without clicking into it.
Folders help once a container passes 15 or 20 tags. Group by function, campaign, or page type, whatever mirrors how your business actually thinks about its marketing. And retire what you don’t use. Old tags for a promotion that ended two years ago aren’t harmless clutter; they’re a real risk the next time someone edits the container and assumes an active tag is dead weight.
Consistency matters more than any specific convention. A messy-but-consistent system beats a “correct” one nobody follows past week two.
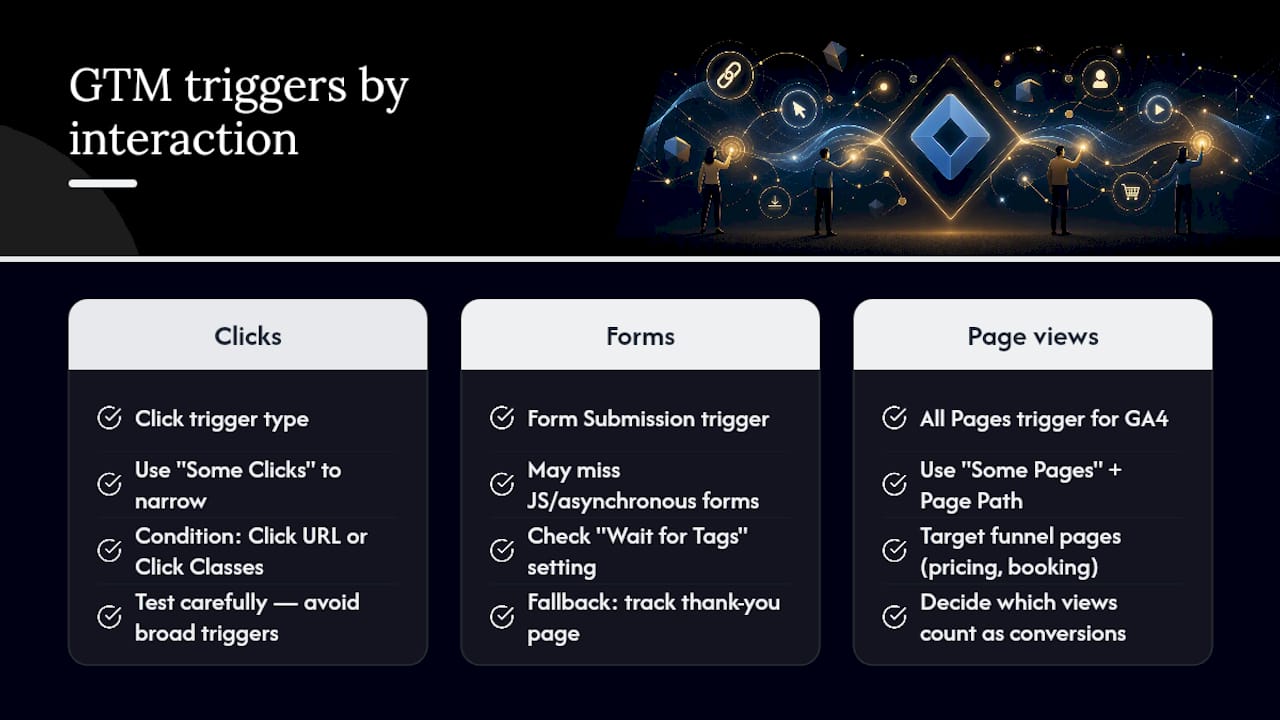
How Do You Track Clicks, Form Submissions, and Page Views?
These three interactions cover most of what a small business actually needs to measure, and each uses a different built-in trigger type in GTM.
Clicks: Use the Click trigger type, then narrow it with “Some Clicks” and a condition like Click URL contains tel: for phone number tracking, or Click Classes contains a specific button class. Test this carefully. A trigger set too broadly fires on every link on the page, flooding your reports with noise instead of signal.
Form submissions: The Form Submission trigger works out of the box on many standard HTML forms, but plenty of form plugins load asynchronously or use JavaScript frameworks that block GTM’s built-in listener. If your submissions aren’t firing, check whether the form uses a “Wait for Tags” setting, or switch to tracking the “thank you” page URL instead, which is often more reliable for hosted form tools.
Page views: The All Pages trigger fires your base GA4 configuration tag, but for tracking specific funnel steps, like a pricing page or a booking confirmation, use “Some Pages” with a Page Path condition. This is also where a conversion tracking guide helps clarify which page views actually count as a conversion worth measuring versus routine browsing.
Build one trigger at a time and preview it before moving to the next. Stacking five new triggers and testing them all at once makes it far harder to isolate which one is broken when something doesn’t fire.
How Do Built-In and Custom Variables Actually Help You?
Variables are the detail GTM beginners skip past, and it’s the fastest way to end up rebuilding tags you already built once.
Built-in variables come enabled by default for things like Page URL, Page Hostname, Click Classes, and Click URL. Turn on the ones you’ll realistically use under Variables → Configure, rather than enabling everything and cluttering your dropdown menus with options you’ll never touch.
Custom variables solve a narrower problem: pulling a specific value from your site that GTM doesn’t track automatically. A constant variable is the simplest type, and it’s exactly what you use for a GA4 Measurement ID or a recurring account number, so you edit one value instead of hunting through a dozen tags. A Data Layer Variable pulls information your site pushes into the data layer, like a transaction total or a product category, which built-in variables can’t see at all.
The practical test for whether you need a custom variable: if you’re about to paste the same string of text into three or more tags, stop and build a variable instead. Six months from now, when that value changes, you’ll be grateful you have one place to edit instead of six.
What Is a Data Layer and Why Does GTM Need One?
A data layer is a small JavaScript object on your page that holds information GTM can read, things your site knows that GTM otherwise can’t see on its own, like a product price, a form category, or a logged-in user status.
Without one, GTM is stuck reading whatever the page’s visible HTML happens to show. With one, your site can push structured information directly to GTM the moment something meaningful happens, like a purchase completing or a specific form loading.
A basic implementation looks like this before the GTM script tag:
window.dataLayer = window.dataLayer || [];
From there, your site (or a developer) pushes events and values into that array as they happen: a completed purchase, a selected product category, a submitted quote form. GTM’s Data Layer Variable then reads those values straight out of the array, no scraping the page’s HTML required.
For most small sites running standard forms and basic ecommerce, the data layer stays simple. Ecommerce platforms like Shopify already generate a lot of this structure automatically. Custom-built sites need a developer to add the pushes manually, which is one of the clearer signals that a project has moved past a do-it-yourself install.
How Do You Set Up Event Tracking in Google Tag Manager?
Event tracking in GTM comes down to three pieces working together: a trigger that defines when something happens, a tag that defines what to send when it does, and (often) a variable that captures a detail about that event.
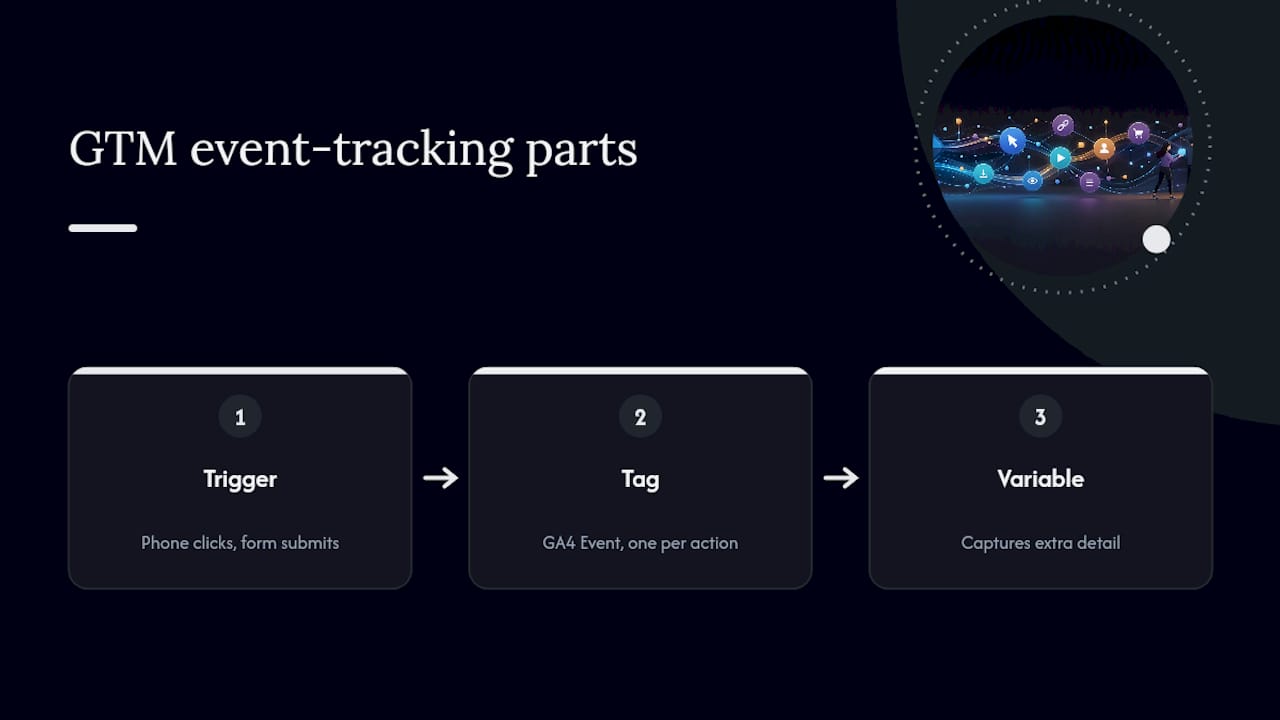
Start with the interactions that map directly to revenue or leads: phone number clicks, quote form submissions, checkout completions, email signups. Build one event tag per action rather than one giant tag trying to capture everything, which makes troubleshooting far easier later.
For a GA4 event tag, choose the GA4 Event tag type, name the event something GA4 will display cleanly (like generate_lead or contact_click), and attach the specific trigger you built for that action. Add event parameters if you want extra detail, like which page the form was on, but resist the urge to track every parameter you can think of. More parameters mean more surface area for something to break silently.
Test every event tag individually in Preview before moving to the next one. Confirm it fires only on the intended action, and confirm the event name shows up correctly in GA4’s DebugView. A guide to tracking campaign performance is worth a look once your core events are live, since the value of event tracking shows up in how you use that data for actual marketing decisions, not just in the setup itself.
What Privacy and Consent Settings Should GTM Users Configure?
GTM itself doesn’t collect personal data. It’s a delivery system for tags, and privacy responsibility sits with what those tags do once they fire.
That distinction matters for a practical reason: if your site serves visitors in regions with consent requirements, like the EU’s GDPR framework, you need a consent management setup before certain tags fire, not after. GTM supports Consent Mode, which lets you block or adjust tags like GA4 and ad platforms based on whether a visitor has granted consent through a cookie banner.
The basic mechanism uses consent triggers or built-in Consent Mode settings on each tag: default consent state loads first (typically denied for regions that require it), and tags either fire in a limited capacity or wait until a visitor actively grants consent through your banner. Most cookie consent platforms integrate directly with GTM’s Consent Mode rather than requiring you to build this logic from scratch.
Beyond consent, basic account hygiene matters more than owners tend to assume. Limit who has Publish access to your container. Use “View” or “Edit” permissions for anyone who doesn’t need to push live changes, and review user access periodically, especially after a freelancer or agency finishes a project. An abandoned account with publish rights on your live tracking container is a bigger risk than most small businesses realize until something goes wrong.
Should You Set Up GTM Yourself or Hire Help?
DIY makes sense for a straightforward site: a WordPress or Shopify build, a CMS plugin available for install, and tracking needs that stop at GA4 and a handful of form or click events. If that’s your situation, the steps above genuinely get you there in an afternoon.
Hire help once you’re dealing with custom ecommerce checkouts, cross-domain tracking between a booking tool and your main site, server-side tagging, or a developer-locked custom build you can’t access directly. A typical agency engagement runs audit, install, test, then handoff, so you’re not left dependent on someone else for every future edit. Tony, who edits this guide, has watched more broken tracking setups come from rushed DIY migrations than from any technical limitation in GTM itself.
— TONY
Want a Done-for-You GTM Setup Instead?
Professional providers can handle the install, the GA4 tag configuration, and the Preview verification in one pass, so you skip the trial-and-error most first-time setups involve. That’s the real advantage over piecing it together solo: you get a working, tested container without burning an afternoon on troubleshooting a trigger that won’t fire.

The process runs the same way it would for any careful setup: an audit of your current site and tracking gaps, the install itself, a verification pass in Preview and DebugView, then a handoff so you understand exactly what’s live and why. If your site also needs a broader look at search visibility once tracking is solid, Ibrand’s website optimization services cover that ground too. Reach out for a quote and tell us what platform you’re running. We’ll tell you honestly whether a quick install or a fuller audit makes more sense for your site.
Where Can You Find Official GTM Documentation?
Start with Google’s own Tag Manager Help center for setup steps, and its CMS installation page for platform-specific instructions. For automation workflows around your marketing stack once tracking is live, tools built for small teams are worth a look too.
Sources
- Set up your Google tag in Google Tag Manager – Tag Manager Help
- Google Tag Manager tutorial for beginners – Analytics Mania
- Google Analytics 4 data delays guidelines – OptimizeSmart
FAQ
Is Google Tag Manager a Tracker?
No. GTM itself doesn’t collect or store visitor data; it’s a delivery system that lets you add and manage tracking tags (like GA4 or ad pixels) without editing site code directly.
Is Google Tag Manager Still Relevant Today?
Yes. It remains the standard method for deploying analytics and marketing tags on websites, and Google continues to update it alongside GA4 and Consent Mode requirements.
What Is Google Tag Manager and How Do You Use It?
GTM is a free tool that manages tracking tags through a web interface instead of hard-coded scripts; you install one container snippet, then add, edit, or remove tags like GA4 or ad conversions directly in GTM without touching your site’s code again.
Why Would a Small Business Use Google Tag Manager?
It lets a non-developer add or update tracking, like a new form submission event or an ad conversion tag, without waiting on a developer for every change, which saves both time and the cost of repeated code edits.
Recent Comments